Category

2016년 12월 18일 일요일

Drone : Connecting to a Vehicle

The connection to the vehicle (or multiple vehicles) is set up within the DroneKit script. Scripts import and call the connect() method. After connecting this returns a Vehicle object from which you can get/set parameters and attributes, and control vehicle movement.
The most common way to call connect() is shown below:
from dronekit import connect

# Connect to the Vehicle (in this case a UDP endpoint)
vehicle = connect('127.0.0.1:14550', wait_ready=True)

The first parameter specifies the target address (in this case the loopback address for UDP port 14550). See Connection string options for the strings to use for other common vehicles.
The second parameter (wait_ready) is used to determine whether connect() returns immediately on connection or if it waits until some vehicle parameters and attributes are populated. In most cases you should use wait_ready=True to wait on the default set of parameters.
connect() also has arguments for setting the baud rate, the length of the connection timeout, and/or to use a custom vehicle class.

There is more documentation on all of the parameters in the API Reference.

Connection string options

The table below shows connection strings you can use for some of the more common connection types:
Connection typeConnection string
Linux computer connected to the vehicle via USB/dev/ttyUSB0
Linux computer connected to the vehicle via Serial port (RaspberryPi example)/dev/ttyAMA0 (also set baud=57600)
SITL connected to the vehicle via UDP127.0.0.1:14550
SITL connected to the vehicle via TCPtcp:127.0.0.1:5760
OSX computer connected to the vehicle via USBdev/cu.usbmodem1
Windows computer connected to the vehicle via USB (in this case on COM14)com14
Windows computer connected to the vehicle using a 3DR Telemetry Radio on COM14com14 (also set baud=57600)
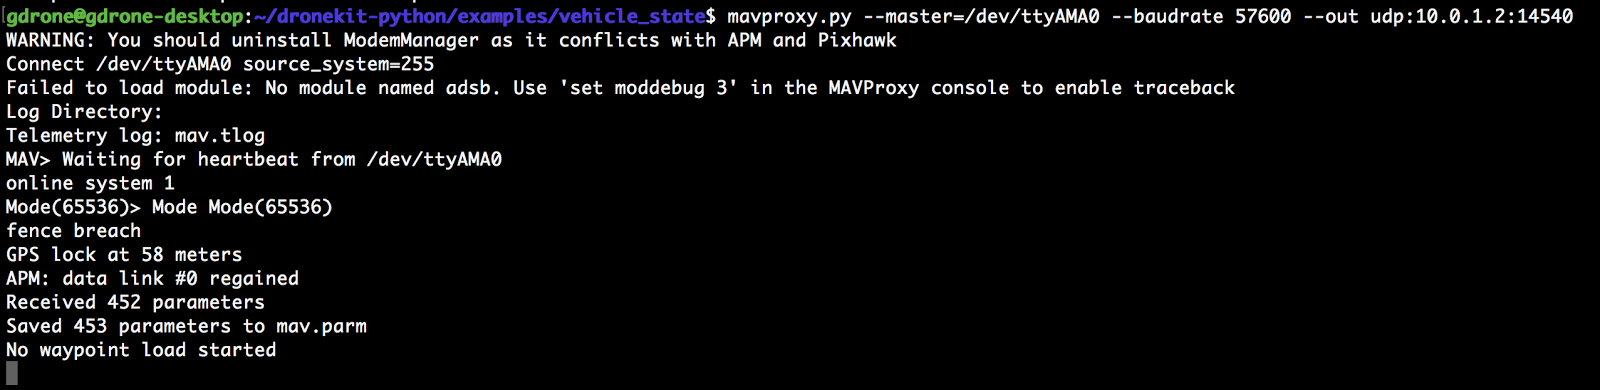
in my case using a connected to the vehicle via Serial port -> /dev/ttyAMA0 (also set baud=57600
ex> connection_string = "/dev/ttyAMA0"
vehicle=connect(connection_string, wait_ready=True)

But not working
Now working


~/Gwang_ws$ mavproxy.py --master=/dev/ttyAMA0,57600


gdrone@gdrone-desktop:~/Gwang_ws$ python show_info.py --connect 127.0.0.1:14550


next plan -> "simple_goto.py"


2016년 12월 14일 수요일

DRONE : Drone Kit Referance 정리


뭔가 연결은 된거 같으면서 안된 느낌 < 인생에 물음표를 던지지 말고 느낌표를 던진다. >

이제 소스를 좀 분석해 보려고 한다. 한줄씩 따라가다보면 그리고 고쳐가다 보면 내 것이 되있겠지~

우리보고 3포~ 9포 세대라고 한다.

오늘 할 일

Drone Kit Referance 정리

DroneKit_Webpage

Getting Start 시작.
DroneKit-Python apps are typically run on Linux-based companion computers that travel on the vehicle and communicate with the autopilot via a serial port. However, during development it is usually easier to prototype apps on a standard Mac, Windows, or Linux computer using a simulated autopilot. 
This topic explains how to set up and run DroneKit-Python (within MAVProxy) on the different host operating systems and then run a basic DroneKit app.

Installing DroneKit on Linux

sudo apt-get install python-pip python-dev python-numpy python-opencv python-serial python-pyparsing python-wxgtk2.8
The remaining dependencies (including MAVProxy), are installed when you get DroneKit-Python from the public PyPi repository:

sudo pip install droneapi

Starting MAVProxy

Before executing DroneKit scripts you must first start MAVProxy and connect to your autopilot (simulated or real). The connection to the vehicle can be set up on the command line when starting MAVProxy or after MAVProxy is running.
-> 여기를 놓쳤구나~!

Connecting at startup

The table below shows the command lines used to start MAVProxy for the respective connection types:

MAVProxy connection options
Connection typeMAVProxy command
Linux computer connected to the vehicle via USBmavproxy.py --master=/dev/ttyUSB0
Linux computer connected to the vehicle via Serial port (RaspberryPi example)mavproxy.py --master=/dev/ttyAMA0 --baudrate57600
SITL connected to the vehicle via UDPmavproxy.py --master=127.0.0.1:14550
OSX computer connected to the vehicle via USBmavproxy.py --master=/dev/cu.usbmodem1
Windows computer connected to the vehicle via USBmavproxy.py --master=/dev/cu.usbmodem1

Connecting after startup

To connect to the autopilot once MAVProxy has already started use link add <connection> in the MAVProxy command prompt, where <connection> takes the same values as master in the table above. For example, to set up a connection to SITL running on the local computer at port 14550 do:

link add 127.0.0.1:14550
If you’re connecting using a serial port you may need to first set up the baud rate first (the default is 57600). You can change the default baudrate used for new connections as shown:

set baudrate 57600    #Set the default baud rate for new connections (do before calling "link add")

~/Gwang_ws$ mavproxy.py --master=/dev/ttyAMA0,57600
mavproxy.py --master=/dev/ttyAMA0,57600 --out=10.0.1.2:14540


2016년 12월 13일 화요일

Drone : MavProxy

--------------------------------------------------------------------------------------------------------------------------

For Auto-Login 

전원만 켜면 자동으로 로그인이 되도록 하였다.
먼저 설정에 가서 User and Group 에서 Password : not asked on login 으로 설정 변경

in a console>>

sudo vim /usr/share/lightdm/lightdm.conf.d/60-lightdm-gtk-greeter.conf

[SeatDefaults] greeter-session=lightdm-gtk-greeter autologin-user=gdrone <--add the line


--------------------------------------------------------------------------------------------------------------------------

DroneKit

-Install


sudo pip install Dronekit


--------------------------------------------------------------------------------------------------------------------------

-Setting

def connect 
connection string option for raspberry pi  GPIO

Linux computer connected to the vehicle via Serial port (RaspberryPi example)/dev/ttyAMA0 (also set baud=57600)

--------------------------------------------------------------------------------------------------------------------------

-Trouble Issue

>>from Dronekit import connect
connect(connect_string,flag) -> 이게 연결 안됨.
dev/ttyAMA0 로 연결 해서 --baudrate 57600 값도 넣어야 하는 데 어떻게 넣는 거지?


def connect :

-Trouble issue_2 

>>> Exception in message handler for HEARTBEAT
>>> mode 196608 not available on mavlink definition
--------------------------------------------------------------------------------------------------------------------------

MAVProxy

-Install


pip install MAVProxy

--------------------------------------------------------------------------------------------------------------------------

-Connect


--------------------------------------------------------------------------------------------------------------------------

-Setting


-Image

->RaspberryPi


 mavproxy.py --master=/dev/ttyAMA0 --baudrate 57600 --out udp:10.0.1.2:14540
baudrate 는 아직 모르겠고 // gpio 핀을 이용하였으므로 /dev/ttyAMA0 라는 디바이스 할당에 out_UDP 는 내 컴퓨터가 할당 받은 IP를 적어서 넘겨주게 만들었다.

->MyCom

Listenning Port 는 위와 통일 되게 같은 포트 번호를 입력한다. ex) 14540
Target Hosts 는 라즈베리파이 가 할당 받은 ip 만 입력 하면 된다.  ex)10.0.1.16
--------------------------------------------------------------------------------------------------------------------------
Baud Rate
보 레이트 (Baud Rate) 는 초당 얼마나 많은 심볼(Symbol, 의미 있는 데이터 묶음을 전송할 수 있는가를 나타내는 말이다이는 이론적인 통신 단위로 초당 신호(Signal) 요소의 수 나타낸다.
만약 하나의 신호요소가 2비트로 구성되어 있는 경우라면 보는 BPS 의 반이 된다, 1보 동안 2비트가 전송된다일반적으로 신호를 1비트로 여긴다면 BPS 와 같은 단위가 된다.
심볼이란 말은 의미 있는 데이터 비트의 묶음이다일반적으로 시리얼 통신에서는 데이터 비트가 8-bit 를 사용하므로 이를 하나의 심볼이라고 이야기 할 수 있다.
1개의 symbol (또는 character) 는 8개의 bit 정보와 같다.
예를 들어, 2400 baud rate 를 갖는다는 말은 1초에 2400개의 의미 있는 심볼 즉 캐릭터를 송신할 수 있다는 이야기이다. 1초에 2400개의 ASCII 코드를 전송할 수 있다는 말로 이해할 수 있다.
--------------------------------------------------------------------------------------------------------------------------
Trouble issue

Traceback (most recent call last):
  File "basic.py", line 10, in <module>
    vehicle=connect(connection_string, wait_ready=True, baud=57600)
  File "/usr/local/lib/python2.7/dist-packages/dronekit/__init__.py", line 2827, in connect
    vehicle.initialize(rate=rate, heartbeat_timeout=heartbeat_timeout)
  File "/usr/local/lib/python2.7/dist-packages/dronekit/__init__.py", line 2100, in initialize
    raise APIException('Timeout in initializing connection.')
dronekit.APIException: Timeout in initializing connection.


2016년 12월 11일 일요일

Drone : Assembling


1.  230_racer airframe


2.  assembling with pixhawk

using a Qgroundcontrol -> basic setting


3. finish


how to connect 4in1_ESC with pixhawk

2016년 12월 8일 목요일

ROS : Install ROS on Raspberry pi 2 b+


 Install ROS on Raspberry pi 2 b+


Feature

RaspberryPI2_B+
OS : Ubuntu mate 16.04 lts. Xenial
ROS Version : Kinectic

need a ROS package

Git hub address :

For What :


1_ install Ubuntu mate 16.04 lts on Raspberry pi 2 B+

2_ install ROS-Kinetic

sudo sh -c 'echo "deb http://packages.ros.org/ros/ubuntu $(lsb_release -sc) main" > /etc/apt/sources.list.d/ros-latest.list'
sudo apt-key adv --keyserver hkp://ha.pool.sks-keyservers.net:80 --recv-key 0xB01FA116
sudo apt-get update
sudo apt-get install ros-kinetic-desktop
sudo rosdep init
rosdep update

sudo apt-get install python-rosinstall

echo "source /opt/ros/kinetic/setup.bash" >> ~/.bashrc
source ~/.bashrc
source /opt/ros/kinetic/setup.bash

mkdir -p ~/ros_catkin_ws/src
cd ~/ros_catkin_ws/src
catkin_init_workspace
 참고 : WikI ROS


QGroundControl 실행하는 데 오류가 뜬다.
Syntax error : "(" unexpected

bash 문제 일수 도 있는 데 아직 해결책을 찾지 못함. (9/ DEC)
3_ install px4_firmware


4_ Connect Pixhawk with Ras


2016년 12월 7일 수요일

Drone : Choose a Drone motor

저번에 230 모델의 모터는 960kv 모터 힘이 많이 없어서 aiming 안되는 것으로 판단 되어 모터를 교체하고 350 기체로 바꾸었다.

이번에 aiming 까지는 성공~! 하지만 불안 하다.

이제부터 것은 적절한 모터를 선택 하는 것도 그것의 설치 요령이다.

이것에 대해 간과 했는 지는 모르지만 이러면서 배우는 겠지... 돈을 펑펑 쓰는 아닌데 미리 알았으면 아낄수 있었을 같다.

1_ 처음 선택 해야 항목은 모터의 크기
  - 주요 포인트
전체 드론의 무게 프레임 사이즈 이다.

IMG_0566.jpg


현재 드론의 무게는  677.1 / 프레임은 350

-2:1 Thrust to Weight Ratio
  출력은 전체 무게의 2배가 되도록 쉽게 생각 해서 쿼드 콥터의 경우 모터 하나 전체 무게의 정도의 출력으로 동작 하면 된다.
  최소 2:1 기준이다. 나중을 위해서 3:1 정도로 예상 하고 만드는 것이 좋다고 생각한다.
  너무 강하면 가벼워 졌을 움직임이 강해서 조정이 힘들어 진다고 생각 된다.

-Motor Size and KV
Brushless 모터 에는 4자리 숫자가 적혀있고 지금 현재 종류의 모터에는 2213-930KV 2208-2600KV 모터를 보유 중에 있다.
다른 기체에 있는 모터 까지 보면 다양하지만 지금 상태에서 2600KV 모터는 힘이 너무 좋다.


잠시만 표를 보고 있으니까 프레임 크기가 클수록 모터의 KV 반비례이네...
KV Trust 말하는 같지는 않다.
모터를 보고 기체에 필요한 Trust 어떻게 찾아 있을까?
구매했던 싸이트를 들어 가니 확인 있네 근데 다음 문제는 값을 보고 내가 어찌 판단 해야 하는 모르겠다는 .

Description:
Brand Name: Emax
Item Name: Emax MT2213 935KV brushless motor
KV: 935
Weight: 55g
Diameter: 27.9mm
Length: 39.7mm
Max Thrust: 850G
ESC Recommended: 18A

Suitable for the Propeller size:
3S:1045
4S: 8045 Propeller


참고 자료 

드론 조립에 전반적인 내용이 설명 되어 있는 같다.

How to choose the right motor for your multicopter drone
dthumb.phinf.naver.net.jpg

썸네일 제거
How to choose the right motor for your multicopter drone
[image] This small guide is to help you choose the right motor for your quadcopter or other multirotor. To help you with this decision, it would be desirable to have several test statistic...
www.dronetrest.com
닫기

HOW TO CHOOSE MOTOR AND PROPELLER FOR QUADCOPTER